THREE.js-PathTracing-Renderer
Real-time PathTracing with global illumination and progressive rendering, all on top of the Three.js WebGL framework.
Quick Controls Notes
-
Desktop: Mouse click anywhere to capture mouse, then the usual Mouse-move and WASD/QZ keys control 1st person camera. Mousewheel to zoom in and out. O and P keys toggle Orthographic and Perspective camera modes. Left/Right arrow keys control camera’s aperture size (depth of field blur effect), while Up/Down arrow keys control the Focal point distance from the camera. ESC key to exit and return the mouse pointer.
-
Mobile: Swipe to rotate 1st person camera. The 4 Large Arrow buttons control camera movement. Horizontal pinch to zoom in and out. Vertical Pinch controls camera’s aperture size (depth of field blur effect). The 2 smaller Up/Down Arrow buttons control the Focal point distance from the camera. Orthographic camera mode can be turned on/off through the GUI checkbox.
LIVE DEMOS
-
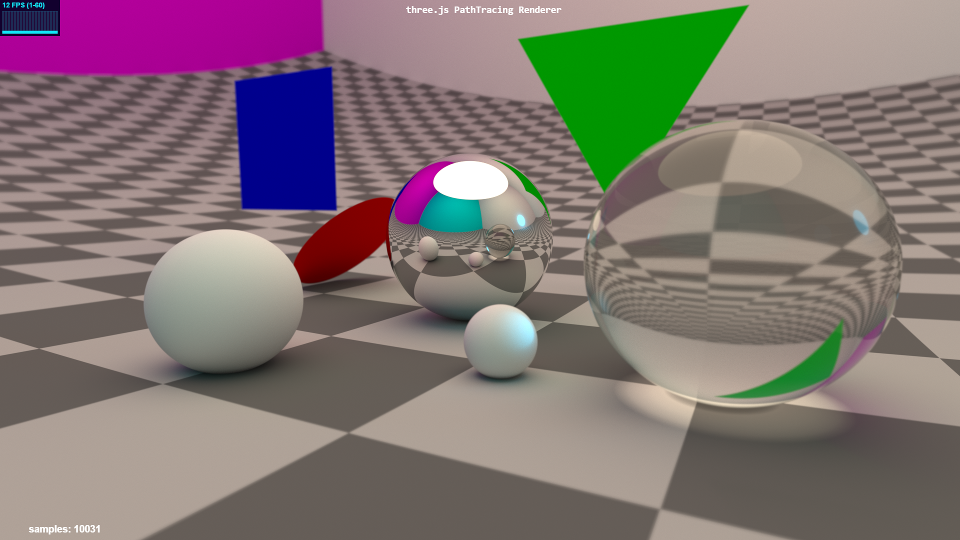
Geometry Showcase Demo demonstrates some primitive shapes for ray tracing, while showing off the renderer’s capabilities - global illumination, true reflections/refractions, bounce lighting, soft shadows, caustics, and near-instant image convergence at 30-60fps, on any device!
-
Ocean and Sky Demo mixes ray tracing with ray marching and models an enormous calm ocean underneath a realistic physical sky. Now has more photo-realistic procedural clouds!
-
Billiard Table Demo shows support for loading image textures (i.e. .jpg .png) to be used for materials. The billiard table cloth and two types of wood textures are demonstrated.
-
Cornell Box Demo This demo renders the famous old Cornell Box, but at 30-60 FPS - even on mobile!
For comparison, here is a real photograph of the original Cornell Box vs. a rendering with the three.js PathTracer:

-
Volumetric Rendering Demo renders objects inside a volume of dust/fog/etc.. Notice the cool volumetric caustics from the glass sphere on the left, rendered almost instantly!
-
Water Rendering Demo Renders photo-realistic water and simulates waves at 30-60 FPS. No triangle meshes are needed, as opposed to other traditional engines/renderers. The Cornell Box is rendered using standard path tracing, while the water surface is achieved through ray marching.
-
Light Shaft Demo demonstrates the rendering of volumetric light shafts (a.k.a. ‘God rays’) which occur when light sources are blocked everywhere except for the lit volume (light shaft). To be able to see these lit volumes vs. surrounding shadow volumes, there must be participating media like smoke, fog, atmospheric gases, etc.. This scene contains a thin, blueish fog.
Natural Environment Ray Marching Demos
-
Terrain Demo combines traditional raytracing with raymarching to render stunning outdoor environments in real time! Land is procedurally generated, can be altered with simple parameters. Total number of triangles processed for these worlds: 2! (for screen size quad) :-)
-
Arctic Circle Demo I was experimenting with my ray marching engine and what types of environments I could get out of it by just altering some parameters. When the scene first opens, it’s almost like you’re transported to the far north! The time of year for this demo is summer - notice how the sun never quite sets below the horizon.
-
Planet Demo (W.I.P.) takes raymarching and raytracing to the extreme and renders an entire Earth-like planet with physically-based atmosphere! Still a work in progress, the terrain is procedurely generated. Although the mountains/lakes are too repetitious (W.I.P.), this simulation demonstrates the power of path tracing: you can hover above the planet at high orbit (5000 Km altitude), then drop all the way down and land your camera right on top of a single rock or single lake water wave (1 meter). All planet/atmosphere measurements are to scale. The level of detail possible with raytracing is extraordinary!
BVH Acceleration Structure Demos
-
BVH Point Light Source Demo Demonstrates the use of a point light to illuminate the famous Stanford Bunny (30,000+ triangles!). Normally a dark scene like this with a very bright small light would be very noisy, but thanks to randomized direct light targeting, the image converges almost instantly!
-
BVH Spot Light Source Demo A similar scene but this time a bright spotlight in the air is aimed at the Stanford Bunny, making him the star of the scene! The spotlight is made out of dark metal on the outside and a reflective metal on the inside. Notice the light falloff on the checkered floor.
-
Animated BVH Model Demo not only loads and renders a 15,000+ triangle GLTF model with correct PBR materials (albedo, emmisive, metallicRoughness, and normal maps), but it also translates and rotates the entire model and its BVH structure in real time! Loading and ray tracing bone animations for rigged models is still under investigation, but getting rigid models to move, rotate, and scale arbitrarily was a huge step forward for the pathtracing game engine!
-
HDRI Environment Demo shows how to load an equi-rectangular HDRI map to use as the scene’s surrounding environment. This demo also uses the optimized BVH accelerator to load the famous Stanford Dragon model consisting of 100,000 triangles and renders the scene in real-time! I also added a material and color picker so you can instantly change the dragon’s material type (glass, metal, ceramic) as well as its material color without missing a beat! Note: please allow 5-10 seconds to download the large HDR image
-
BVH Visualizer Demo Lets you peek under the hood of the BVH acceleration structure and see how the various axis-aligned bounding boxes are built all the way from the large surrounding root node box (level 0), to the small leaf node boxes (level 14+), to the individual triangles of the model that are contained within those leaf node boxes. This demo loads the famous Stanford Dragon (100,000 triangles!) and renders it as a purple light source inside yellow glass bounding boxes of its BVH.
-
GLTF Model Viewer This cool viewer not only loads models in glTF format, but also uses three.js’ RGBE.Loader to load an equi-rectangular HDR image as the background and for global lighting. Many thanks to github user n2k3 for his awesome contributions to this viewer! He implemented a slick loading animation as well as a GUI panel that allows you to change the sun angle, sun intensity, sun color, hdr intensity, and hdr exposure.
-
BVH Model Instancing Demo This demo loads a glTF model, but instead of rendering its triangles as triangles, we replace each triangle with a brand new smaller instance of that model! For instance, the demo opens with the famous Utah Teapot model, containing ~1,000 triangle faces, and each of those faces is replaced with another small teapot with its own 1,000 triangles. So that means 1,000 tris * 1,000 meshes = ~1 Million polygons, each fully path traced in real time in the browser! The heavier Stanford Dragon model has 100,000 triangles - so 100,000 tris * 100,000 meshes = 10 Billion polygons in your browser, even on a cell phone! To add to the craziness, each of the smaller instances has its own unique transform matrix within its small AABB bounding box. That means that we can have thousands of rotated, positioned, and scaled models, all doing their own thing in real time! This is another testament to the power of WebGL2. Definitely pushes the limits of my humble BVH system to the max. ;-)
Raytraced Shapes Demos
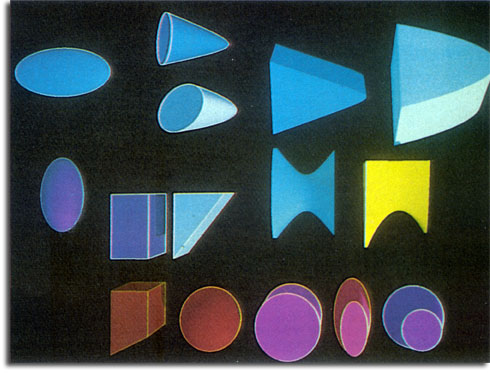
The above image was my inspiration to embark on the years-long (and still ongoing!) journey to implement a complete library of analytically ray-traced mathematical shapes that can be rendered in realtime inside a browser. The image is a computer screen grab from an old cinema magazine article showing how the vintage CG company MAGI made their iconic imagery for the 1982 movie, TRON. I saw that movie in theaters when it came out (I was 9 years old, ha) and at first I thought, since it was a Disney movie, that their artists had hand-drawn all the crazy scenes and sci-fi vehicles. As the end credits rolled though, it said ‘computer imagery and animation by MAGI’. Mind blown! At 9 years old in the early 1980’s, I hadn’t seen anything like that in a movie - I couldn’t even comprehend how they made all those cool scenes/vehicles inside of a computer! The film really peaked my interest in computer graphics and nearly 40 years later, I am happy to report that my quest to be able to render all the shapes that MAGI could has been largely successful! For those that are interested in the math, these are all quadric shapes - shapes that can be defined implicitly (i.e., a unit sphere: x2 + y2 + z2 - 1 = 0) and reduced to a quadratic equation in the ray’s ‘t’ value, which can be easily solved by a computer to quickly find the roots (t0, t1). Using these mathematical primitives, MAGI was able to construct all the cool vehicles featured in the movie. An interesting side note: they did not use triangles/polygon modeling like the CG industry does today - it was mainly these math shapes with pixel-perfect continuous-looking curves. Also noteworthy is that they used ray tracing to render the final animations. Each frame took 30 minutes to multiple hours. Well I’m happy to say that you won’t have to wait that long to see an image now - my shapes render at 30-60 FPS inside your browser, even on mobile! ;-)
-
Quadric Geometry Demo showing different quadric (mathematical) ray tracing shapes. The 3D Quadric shapes family includes the most familiar mathematical 3D shapes: Spheres(ellipsoids), Cylinders, Cones, and also some shapes that are not as well-known: Paraboloids, Hyperboloids, Hyperbolic Paraboloids, etc.
-
Quadric Shapes Explorer This demo lets you explore the endless variety of quadric shapes. All quadrics are defined with a set of parameters (usually labeled A through J) that describe the type and look of the shape. I recently came across a little gem of a research paper entitled “Ray Tracing Arbitrary Objects on the GPU” by Wood et al. from back in 2004. In the paper the authors describe an efficient method of storing the quadric shape parameters (A-J) inside a tidy 4x4 matrix, which fits nicely in GPU memory. Any quadric shape imaginable can easily be constructed by adjusting the A-J parameters inside the 4x4 matrix. I implemented their technique for this demo. Taking it a step further, I provided a GUI menu list of standard shape presets (Sphere, Cone, Paraboloid, etc), so you can see how the more well-known shapes’ parameters are set. I also turned these A-J quadric shape parameters into handy GUI sliders so you can easily play around with the parameters and watch the path-traced 3D shapes change right before your eyes!
-
Transforming Quadric Geometry Demo Using the game engine version of the three.js path tracer, this demo shows how to create multiple objects (a bunch of ‘THREE.Object3d()’s, each with its own transform) on the JavaScript side when initializing three.js, and then send the objects over to the GPU for realtime pathtracing. The nice thing about having my pathtracer sitting on top of three.js is that I can use its built-in transformations such as Translate, Rotate, and Scale. Since these shapes are all quadrics made from different parameters, I also included clipping parameters so you can have partial shapes and can even animate the cutting process!
-
Quads-Only Model Demo Here’s my ray tracing hot take: For 3D Model rendering, we need to move away from Triangles as primitives, and move towards Quads instead. This demo uses Quads (BiLinear Patches) instead of the usual Triangles to render the yellow Duck model on the right. And on the left, I put two of these BiLinear patches together and allow the user to move all of the quads’ vertices up and down to see the cool shapes you can get. These types of Quads have advantageous properties, such as they are free to be non-planar (the 4 vertices can be located anywhere and the quad is still renderable), they can be bent or even twisted on themselves, no changes are necessary to the vertex data when going from Tris to Quads (pos, normals, and uvs can remain exactly the same!), and in terms of model creation artists: their workflows often start out in Quads-mode when modeling, so artists could just stay in their preferred Quads-mode from start to finish - no tesselation to Triangles needed. And when dealing with models that were originally in Triangles, by combining every 2 Triangles into 1 Quad, not only do you save memory and BVH size (by at least 50%), intersecting 1 Quad is actually faster than intersecting the 2 Triangles it was made from! Now, as with any method, there are some trade-offs: such as some models are not so easy to automatically convert from Tris to Quads (like the Stanford Bunny & Dragon models), and Quads are not supported by most modern model formats (I had to use the older OBJ format for this demo) because Triangles are the industry standard, not Quads. But I believe that if enough people want to use Quads and artists would like to keep their workflows the same without the need for tesselating to Triangles, then I could see more formats (like the popular glTF) adding basic support for Quads.
-
Cheap Torus Alternative Demo Introducing the Cheap Torus, my custom approximation to the beautiful Torus shape. Historically, the Torus has always been difficult and expensive to ray trace, because it is a quartic (degree 4) shape which requires you to solve for the roots of a quartic equation. I’ve tried many different quartic solvers out there and they are either too finnicky to use and get looking right, or too expensive to efficiently run on normal consumer hardware and mobile. And then after doing all that work, you still get rendering artifacts like gaps and thin cracks at larger scales, due to limited GPU shader float precision. So, determined to efficiently render a Torus that would be air-tight at all scales, I set out on a journey to find a better solution. While going down this rabbit hole, I discovered a cool trick of combining 2 simple quadric shapes (only degree 2), namely the Hyperboloid (hourglass) and the truncated Sphere (both top and bottom removed). When these 2 simple shapes are combined in just the right way, we get a very close approximation to the Torus, free of gap artifacts at all scales and very fast to render. Now we can finally have multiple Torii all over our scenes without worrying about precision artifacts or performance costs - enjoy!
-
Classic Torus Shape Demo After working on a cheap alternative to the Torus shape (above demo), a fairly recent numerical solver by Cem Yuksel caught my eye. As mentioned above, the classic Torus shape is difficult to ray trace because it requires solving a quartic equation (degree 4), which is not only expensive, but also is numerically unstable and prone to artifacts when using a traditional solver. Enter Cem Yuksel’s brilliant state-of-the-art polynomial equation solver, which not only handles root finding of higher-order polynomial equations, but does so efficiently and with stability. In fact, you can throw any degree of polynomial at his solver, all the way up to degree 10! Dr. Yuksel demonstrates this in his wonderful Youtube video where he intersects a ray with a curved elongated tube shape that is useful for hair/fur rendering - which requires solving a 10th degree polynomial! Since the Torus ‘only’ requires a 4th degree polynomial (ha), I figured I would give his new system a try, and make one last-ditch effort to efficiently and accurately solve the Torus shape numerically. I’m happy to report it finally works! The Torus shape is now perfectly rendered, air-tight, with no gap or crack artifacts. In this demo I added the ability to scale and rotate the shape, make the Torus hole smaller and bigger, apply many different kinds of Clipping to the shape, change its material and color, as well as play around with the UV settings to see how the checkerboard texture changes. Many thanks to Cem Yuksel for his brilliant new solver and for sharing his findings with the entire graphics community!
Constructive Solid Geometry(CSG) Demos
The following section deals with different techniques in Constructive Solid Geometry(CSG) - taking one 3D mathematical shape and either adding, removing, or intersecting a second shape.
- Constructive Solid Geometry Viewer
This viewer allows you to easily experiment with different CSG configurations while seeing the results path-traced in real time! You can select a CSG Operation from the Operations list - Union (A+B), Difference (A-B), or Intersection (A^B). Briefly, a ‘Union’ operation means that the outside of shape A is fused with the outside of shape B, creating a new single shape with a single interior volume. A ‘Difference’ operation means that shape A is cut out with shape B (shape B by itself will be invisible, but its influence will be visible as a section missing from shape A where the two overlap). An ‘Intersection’ operation means that wherever shape A touches shape B, a new shape/volume will be created (the two shapes must overlap, otherwise no new shape will be seen). I added a detailed and fully-featured GUI menu system so that you can easily modify the CSG Operation type, both shapes’ Transforms (Position, Scale, Skew, Rotation), both shapes’ base geometry (Sphere, Box, Cylinder, Cone, Paraboloid, etc.), their material type (Diffuse, Transparent Refractive, Metal, ClearCoat Diffuse) and their RGB material color. I have spent hours trying various configuration possibilities, which are seemingly endless (ha)! I hope that you too will have fun experimenting with this viewer and seeing what new shapes you can create!
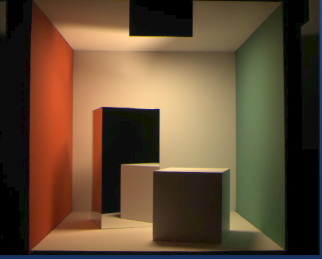
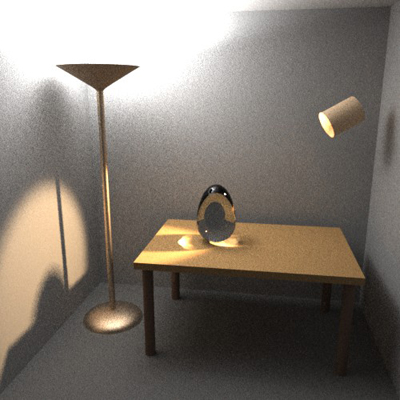
All of the following 4 demos feature a large dark glass sculpture in the center of the room, which shows Ellipsoid vs. Sphere CSG.
-
CSG_Museum Demo #1 Along the back wall, a study in Box vs. Sphere CSG
-
CSG_Museum Demo #2 Along the right wall, a glass-encased monolith, and a study in Sphere vs. Cylinder CSG
-
CSG_Museum Demo #3 Along the wall behind the camera, a study in Ellipsoid vs. Sphere CSG
-
CSG_Museum Demo #4 Along the left wall, a study in Box vs. Cone CSG
Important note! - There is a hidden Easter Egg in one of these 4 Museum demo rooms. Happy hunting!
Sometimes we don’t want any curves at all (ha) - rather, we’d like to be able to render simple, straight-edged, faceted shapes such as pyramids and prisms. Using a technique developed by Eric Haines for his article in Graphics Gems II (published 1991), I created several routines to efficiently raycast these special shapes in the browser. The algorithm takes in a set of user-defined cutting planes. These planes are of type ‘vec4’ and consist of a 3D normal vector to the plane, as well as a float distance to the plane from the shape’s origin (its center of gravity). For instance, to define a simple unit cube, you would provide 6 planes, all with normals pointing in different cardinal axis directions, and all with a distance of 1.0 from the cube’s origin. All pyramids, prisms, and Platonic solids can be built up in a similar manner. The ray intersection algorithm then takes these small lists of cutting planes and uses them as ‘half-spaces’, resulting in perfectly sharp, straight-edged, faceted shapes.
Check out the demo below, which renders the most common convex polyhedra (faceted shapes) that we might want to have in a scene. The demo includes a couple of material presets such as diffuse, metal, glass, and clearCoat diffuse, as well as a roughness slider. Finally, the shapes’ transforms are exposed in the GUI menu, so you can easily adjust the position, scale, rotation, and skew of all the shapes in real time!
Materials Demos
-
Switching Materials Demo This demo showcases different surface material possibilities. The materials that are feautured are: Diffuse (matte wall paint/chalk), Refractive (glass/water), Specular (aluminum/gold), ClearCoat (billiard ball, plastic, porcelain), Car clearCoat (painted metal with clear coat), Translucent (skin/balloons, etc.), and shiny SubSurface scattering (polished Jade/wax/marble, etc.)
-
Material Roughness Demo Demonstrates increasing levels of roughness on different materials. From left to right, roughness on the left sphere is set at 0.0, then 0.1, 0.2, 0.3 etc., all the way to the max: 1.0 roughness on the right sphere. The demo starts out with a clearcoat cyan plastic-like material, but you can choose different material presets from the selection menu, as well as change the material color in realtime. I have researched and improved the importance sampling of specular lobes for various amounts of roughness, which results in very fast convergence, especially with smoother to medium-rough materials. Try all the presets for yourself!
Quadric Shapes BVH
The above image of the classic scene entitled “Invisible Date” (by Christa Marx, 2000) inspired me to try and render it in real time with the browser. I knew the amount of geometry was going to be a challenge, simply because the original scene was composed of several thousands of triangles. Now my standard triangle BVH system could have handled it, and it would have run smoothly on a desktop with a nice GPU - but not so much on mobile devices. Devices like cell phones have a harder time traversing the deep BVH trees that these kind of triangle-heavy scenes produce. Then, I noticed that most of ‘Invisible Date’s geometry (except for the Utah Teapot) was built up from simple, quadric shapes like spheres, cylinders, cones, and rectangular boxes of various dimensions. So I decided to put together a custom ‘Shapes BVH’ system - instead of handling thousands of small triangles as all other ray tracing BVH builders do, it instead works with larger, simpler shapes like spheres and boxes that are ray tracing-friendly. Since a larger, quadric shape can cover an area that would have required hundreds of triangles, now the geometry count goes down exponentially! Instead of several thousands of triangles and all of their bounding boxes required for the original scene, our new ‘Shapes BVH’ boils everything down to… 54 shapes! And a BVH tree with only 54 leaves (the shapes themselves) will basically run on a toaster, lol! When I first tried out this classic scene on my phone, I was delightfully surprised that it ran at a smooth 60 FPS! Check it out for yourself:
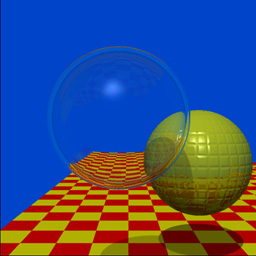
For a while now, I have been wanting to recreate the scene below from the cover of Peter Shirley’s awesome Ray Tracing In One Weekend book. The original scene contains over 480 spheres placed randomly on the ground, each having a different color and different material (and roughness on metals). At the end of the book, this static scene is progressively rendered over several minutes to produce the final image. I brought this iconic scene into real-time by using my Shapes_BVH system to construct a BVH around all of the smaller spheres. This alone made the scene rendering times go from minutes to 60+ fps! Next, I took it a step further by adding various animations to all of the smaller shapes, as well as the ability to change the spheres into other interesting shapes. By checking the Show_BVH_Leaves box, you can see how the BVH leaf AABBs adapt to better fit all the smaller shapes, depending on the current animation and shape choices.
I think that this system might help us get closer to the dream of having most graphics ray traced in real-time with the browser, especially when it comes to under-powered devices like cell phones, tablets, and mobile VR headsets. I don’t believe that we can just throw the standard ‘triangle BVH’ system at phones and tablets and expect them to perform like a desktop with an NVIDIA RTX ray tracing card. I think that for the time being, until small mobile devices get way faster and more energy efficient, that we will have to rely on more ‘outside-the-box’ thinking and techniques, if we are to have any hope of having high quality ray-traced graphics available everywhere around us, on any device. I’m really excited to see what the future of graphics on the web has in store for us.
Path Tracing 3D Fractals

Another good use case for my Shapes BVH technique is for path tracing 3D fractals. By using these raytracing-friendly shapes, we can have over 200,000 shapes, each with their own unique transform and material, all running at 30-60 fps…even on your cell phone! Here is a demo that generates many iterations of the ‘cube-frame’ 3D fractal. This scene also features a physical sky model that renders a realistic, atmospheric sky as seen from Earth. In the GUI menu, you can rotate the Sun to get different times of day as well as play with the lighting and soft shadows in real time. You can also select from 10 interesting camera viewpoint presets that show off the epic fractal nature of the building as well as its dramatic lighting effects.
- Cube-Frame 3D Fractal demo Note: It may take up to 10 seconds to compile this complex scene, but it’s worth the wait! :)
Classic Scenes / Ray Tracing History
<img src=”https://github.com/erichlof/THREE.js-PathTracing-Renderer/blob/gh-pages/readme-Images/4-Figure7-1.png” width=30% height=30%>
Arthur Appel is credited with the first formal mention of Ray Tracing (raycasting and shadow rays, shown above) in his 1968 paper Some Techniques for Shading Machine Renderings of Solids while working at IBM Research (TJW Center). Mr. Appel used this new technique to help visualize machine parts and architectural concepts on printed paper in black and white. The scene data was sent to an IBM 1627 (Calcomp) digital plotter that cleverly used text characters (like ‘+’) with different spacing and brightness to differentiate the various shading of sides of a 3D model under a virtual light source. Here are a few examples of Mr. Appel’s digital plot renderings from his 1968 paper:
<img src=”https://github.com/erichlof/THREE.js-PathTracing-Renderer/blob/gh-pages/readme-Images/2-Figure2-1.png” width=20% height=20%> <img src=”https://github.com/erichlof/THREE.js-PathTracing-Renderer/blob/gh-pages/readme-Images/4-Figure3-1.png” width=70% height=70%>
For reference, here is a link to all the images featured in the research paper: Original Appel Renderings (click on the ‘View All 14 Figures and Tables’ button below the first images).
And here is a demo that lets you literally ‘jump into’ Appel’s 1968 research paper and experience his groundbreaking techniques of per-pixel raycasting and shadow rays:
Scenes that used to take several minutes on Appel’s digital plotting device now run at 60 fps in your browser! I think Arthur would get a kick out of dragging the sunlight around in real time on his classic scenes!
Until now (2021), actual photos of Arthur Appel were not publicly available (none can be found with a thorough internet search). All that was known was that he was working at IBM Research (TJW Center) at the time he wrote this seminal 1968 paper. I really wanted to see what Mr. Appel looked like, and to share and celebrate his image and contributions to the field of Ray Tracing and Rendering. With a little hesitation at first, I reached out to the IBM Corporate Archives in New York to see if they might have any remaining employee portraits of Arthur Appel. I’m so glad I did, because I met (via email) a wonderful IBM Archive employee, Max Campbell, who kindly searched the entire archives and found 2 rarely-seen photos of Mr. Appel. Since these images are copyrighted by IBM (and NOT a part of my repo’s CC License), Max also kindly and graciously helped me to obtain permission from IBM to share these historic photos of the man who started it all! Click on the images to see the full resolution photos:
<img src=”https://github.com/erichlof/THREE.js-PathTracing-Renderer/blob/gh-pages/readme-Images/1982_December_Arthur%20Appel_IBM%20Research%20Magazine.png” width=20% height=20%>
Arthur Appel, from the IBM Research Employee Gallery, ca. 1982
Reprint Courtesy of IBM Corporation ©
<img src=”https://github.com/erichlof/THREE.js-PathTracing-Renderer/blob/gh-pages/readme-Images/1983_December_Arthur%20Appel_IBM%20Research%20Magazine.png” width=20% height=20%>
Arthur Appel demonstrating display architecture, from IBM Research Magazine ca. 1983
Reprint Courtesy of IBM Corporation ©
Many thanks to Max Campbell at IBM Research Archives for locating these rare photos and helping me to obtain permission to share them with everyone who is interested in ray tracing! It is so nice to be able to finally put a face with the name of one of my ray tracing heroes. Thank you Arthur Appel for your historic contributions to the field of Computer Graphics!
While working at Bell Labs and writing his now-famous paper An Improved Illumination Model for Shaded Display, J. Turner Whitted created an iconic ray traced scene which showcased his novel methods for producing more realistic images with a computer. Beginning work in 1978, he rendered a handful of scenes featuring spheres and planes with various materials and reflectivity, so that these images would be included in his paper (which would be published in June 1980). Then for an upcoming SIGGRAPH conference submission, Whitted decided to create an animated sequence of individual rendered images. Thus the first ever ray traced animation was born! This style of putting together single frames of pre-rendered images would continue through a great lineage of movies such as Tron, Toy Story, Cars, all the way to current animated feature films.
Vintage 1979 Video: ‘The Compleat Angler’ by J. Turner Whitted
Although this movie appears as a smooth animation, it took around 45 minutes to render each individual frame back in 1979! Fast forward to today and using WebGL 2.0 and the parallel processing power of GPUs, here is the same iconic scene rendered at 60 times a second in your browser! :
Thank you Dr. Whitted for your pioneering computer graphics work and for helping to start the rendered animation industry!
In 1986 James T. Kajiya published his famous paper The Rendering Equation, in which he presented an elegant and profound unifying integral equation for rendering. Since the equation is infinitely recursive and hopelessly multidimensional, he suggests using Monte Carlo integration (sampling and averaging) in order to converge on a solution. Thus Monte Carlo path tracing was born, which this repo follows very closely. At the end of his paper he included a sample rendered image that demonstrates global illumination through Monte Carlo path tracing:

And here is the same scene from 1986, rendered in real-time:
The next classic ray traced scene comes from Eric Haines. In 1987 for the SIGGRAPH Art Show, Haines presented an image of several thousand spheres arranged in his custom 3D fractal pattern, which he called ‘Sphereflake’. The fractal is generated by first placing the large root parent sphere in the center. Then 9 smaller child spheres are placed at equidistant angles on the parent sphere’s surface. On the next iteration, those 9 child spheres become parents themselves, spawning 9 even smaller child spheres on their surfaces. The process continues in fractal fashion, leading to an exponential increase in the amount of spheres on each iteration.

For this demo, I chose 4 iterations of Haines’ fractal pattern, which means that in the end we have: 1 root parent sphere + (9) + (9x9) + (9x9x9) + (9x9x9x9) = 7,381 spheres total! This dense fractal structure relies on my new custom Shape_BVH builder, which instead of handling typical triangles of a triangular model, handles quadric shapes (spheres, boxes, cylinders, cones, paraboloids, etc.) for fractal and CSG models. These simple math shape primitives are ray-tracing friendly and with the help of my BVH tree builder, it accelerates the rendering to real-time, even on your cell phone! Also, this demo allows you to change the entire Sphereflake material to common material presets, like metal, clearCoat, glass, etc. Just for fun, I included a ‘Random’ material option which assigns a randomized unique material type to each of the 7,381 spheres!
Here is Haines’ Sphereflake fractal, path traced in real-time:
Bi-Directional Path Tracing
In December of 1997, Eric Veach wrote a seminal PhD thesis paper on methods for light transport http://graphics.stanford.edu/papers/veach_thesis/ In Chapter 10, entitled Bi-Directional Path Tracing, Veach outlines a novel way to deal with difficult path tracing scenarios with hidden light sources (i.e. cove lighting, recessed lighting, spotlights, etc.). Instead of just shooting rays from the camera like we normally do, we also shoot rays from the light sources, and then later join the camera paths to the light paths. Although his full method is difficult to implement on GPUs because of memory storage requirements, I took the basic idea and applied it to real-time path tracing of his classic test scene with hidden light sources. For reference, here is a rendering made by Veach for his 1997 paper:
And here is the same room rendered in real-time by the three.js path tracer:
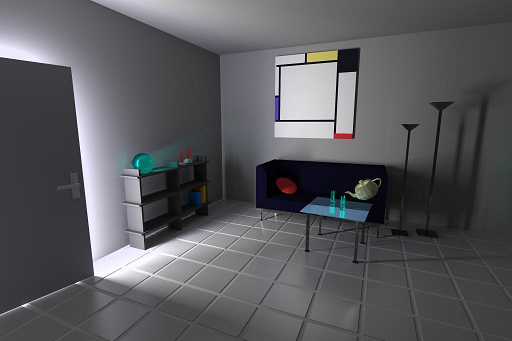
The following classic scene rendering comes from later in the same paper by Veach. This scene is intentionally difficult to converge because there is no direct light, only indirect light hitting the walls and ceiling from a crack in the doorway. Further complicating things is the fact that caustics must be captured by the glass teapot on the coffee table, without being able to directly connect with the light source.
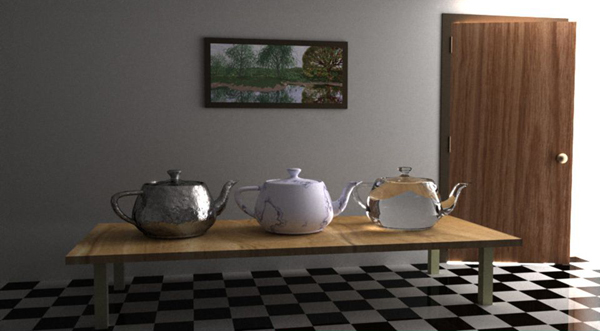
And here is that scene rendered in real-time by the three.js path tracer: Try moving the GUI slider to open and close the door!
I only had the above images to go on - there are no scene dimensions specifications that I am aware of. However, I feel that I have captured the essence and purpose of his test scene rooms. I think Veach would be interested to know that his scenes, which probably took several minutes if not hours to render back in the 1990’s, are now rendering real-time in a web browser! :-D
For more intuition and a direct comparison between regular path tracing and bi-directional path tracing, here is the old Cornell Box scene again but this time there is a blocker panel that blocks almost all of the light source in the ceiling. The naive approach is just to path trace normally and hope that the camera rays will be lucky enough to find the light source:
- Naive Approach to Blocked Light Source As we can painfully see, we will have to wait a long time to get a decent image! Enter Bi-Directional path tracing to the rescue!:
- Bi-Directional Approach to Blocked Light Source Like magic, the difficult scene comes into focus - in real-time!
Global Illumination on Wikipedia
<img src=”https://github.com/user-attachments/assets/0d7921ef-60e5-4886-acf3-cfda001b9829” width=30% height=30%>
<img src=”https://github.com/user-attachments/assets/ea71983b-6003-453e-a75d-e99b4091ffd9” width=40% height=40%>
<img src=”https://github.com/user-attachments/assets/4ceec5a0-fec4-40c0-b1ad-9eebd7754bd3” width=25% height=25%>
I’ve always been inspired by the community rendering examples found when searching for ‘global illumination’ or ‘ray tracing’ on Wikipedia. I selected 3 examples that I feel are the best representations of these terms/subjects on their Wikipedia articles. Using only the original Wikipedia images, I tried to recreate each scene as closely as possible in terms of scene objects, color, lighting, camera angle, and depth of field (out-of-focus effect). This demo lets you select any of the 3 scenes from the drop-down menu on the right. The original renderings provided to Wikipedia probably took several minutes to get a clean image, when using typical rendering software. However, now that we have these same scenes rendered with the Three.js PathTracing Renderer, we can adjust the camera settings and fly our camera through these environments, all while the beautiful scenes render at 60+ fps - even on mobile!
Game Engine path tracer for Desktop and Mobile
Before I got into this world of path tracing, I was a 3D game programmer, and still am, although path tracing is consuming most of my coding time! Way back in 1996 after I had just graduated with my Masters degree in Music (I’m a professional musician and music teacher for over 30 years now), my younger brother Brian got me hooked on programming 2D games as a hobby - at the time he was taking a high school elective computer programming class in which they used the Pascal programming language. We started a fun project together using Pascal and running on DOS, and we were able to make a simple little top-down 2D game that barely worked. From there I really dove into the world of programming on my own, and bought many books on QBasic, C, Windows programming, DirectX programming, and eventually OpenGL 1.1. When I had learned enough to do basic 3D graphics programming with OpenGL for Windows 98, my brother and I decided to form a hobbyist game studio with just the two of us (I did most of the C/OpenGL coding while he handled the game audio and our website creation and management). We called ourselves the Binary Brotherz (to this day we still argue over who was considered the “1”, and who had to be the “0”, lol!) and we released several small, always free to play (online donation based) 3D action games starting in the late 1990’s until about 2002. Our first release was in 1998, back when these new things called ‘graphics cards’ were all the rage! Here’s an internet-archived link to see what our old Binary Brotherz website looked like all those years ago! After 2002 I took a break from hobby programming every day to pursue my music career. But graphics and game programming were always in my heart and around 2011 when I discovered this new thing on the web called ‘Three.js’, it got me back into my passion hobby, and the rest is history!
Although using OpenGL/C back in the late 90’s and WebGL with Three.js in 2011 was cool, I always wanted more in terms of lighting, shadows, reflections, diffuse color sharing, etc., in my game engines that I just couldn’t get from rasterizing graphics APIs. Well, fast forward to 2019 and NVidia released graphics cards dedicated to real-time ray tracing - I couldn’t have imagined this back in the 90’s! However, at the time I’m writing this, NVidia’s ray tracing and path tracing features only work on their hardware, which excludes a lot of players who don’t have an expensive RTX card and powerful desktop PC or the latest console. Instead, I wanted to see if I could ‘overclock’ my web-based path tracer’s convergence so that all players could see the beautiful lighting effects in real time, being able to possibly move a game character or 1st-person camera through a path-traced dynamic game environment at 30-60 fps, even on mobile. If you’re willing to sacrifice some ultimate physical reality (like perfectly converged reflected/refracted caustics), then you can have this!:
- Future Game Engine PathTracer Demo
To my knowledge, this is just about as fast as I can push the path tracing engine and WebGL in general, and still retain good lighting, accurate reflections, and almost instant image convergence. As computers get faster, this will be the heart of future game engine renderers - a simple path tracer that is much less lines of code than a traditional rasterizing renderer with all of its required lighting hacks. The game engine’s path tracer will be easier to maintain and debug, and will naturally produce photo-realistic real-time results! I already have some ideas for some simple 3d games that can use this technology. I’ll keep you posted!
PATH TRACED GAMES
I am pleased to announce the first ever path traced game for desktop and mobile: AntiGravity Pool! If you’ve ever played American 8-ball before, then you already know how to play - except that gravity has been shut off! LOL. I tried to imagaine how our distant future descendants would enjoy the game of billiards while in the HoloDeck. Warping the 2D classic pool table into a 3D cube presents some unique and interesting challenges for the player. AntiGravity Pool features real-time raytraced reflections, soft shadows, and path traced global illumination from 8 light sources (which is challenging for path tracers). Since it uses a physics engine and various custom components, I decided to create a dedicated repository for just this new game. Be sure to check it out!
- AntiGravity Pool game on Desktop, press SPACEBAR to shoot! :)
- AntiGravity Pool project
Continuing my series of path traced games for desktop and mobile, I happily present: Path Traced Pong! The iconic game of Pong holds a special place in my heart as it was my first computer game experience as a 6 year old in 1979, played on my brand new Atari 2600! My version of Pong brings the classic into 3D, and is played inside the CG-famous ‘Cornell Box’. Path Traced Pong features real time raytraced reflections, soft shadows, transparency, dynamic light sources, and path traced global illumination. As with AntiGravity Pool, I made a dedicated repository for just this new game. I must say, once you start playing, it’s hard to stop! I didn’t realize how addictive it would become!
- Path Traced Pong game on Desktop, click to capture Mouse
- Path Traced Pong project
In 1986 when I was 13 years old and on my Commodore 64 (I know, I’m old), Geoff Crammond released his masterpiece, The Sentinel. This iconic game featured true 3D filled polygons (an amazing feat running on underpowered 80’s hardware!) and had a haunting look and atmosphere like no other before it (or after). This was the first game that I played that truly immersed me, surrounding the player from all angles with its sterile, other-worldly environment. I’ve always wanted to pay homage to my favorite game of all time, while maybe adding some of my personal path tracing touch to it. So it is with much joy that I present, The Sentinel: 2nd Look. This fully path traced remake contains a random landscape generator (which I had to figure out from looking at the classic over several months), an added day cycle, pixel-perfect raytraced shadows on the terrain and game objects, object self-shadowing, and true raytraced reflections on the white/black connector panels of the landscape.
Creating this remake forced me to figure out how to make a dynamic top-level BVH over many moving, rotating game objects/models, each with their own unique BVHs for their own triangle geometry. I’m happy to report that not only does my new system work, it can completely rebuild and update the whole top-level BVH in a split second, allowing for more complex, path traced dynamic game environments! As of now, this project is a W.I.P. (gameplay and game logic to be added soon), but I just wanted to share this passion project of mine, as well as the technical major step forward (in BVH technology) that will allow a wider range of real time games and applications to be path traced right inside your browser!
- The Sentinel: 2nd Look (W.I.P.) game on Desktop, click to capture Mouse
- The Sentinel: 2nd Look project
The most recent path traced game that I’ve been working on is Glider Ball 3D. Unlike the 3 previous games mentioned above, Glider Ball 3D is an original game (instead of updating a classic game) that has had a long and choppy history. As mentioned, way back in 1998, my younger brother Brian and I formed a hobbyist game studio called the Binary Brotherz and we released several small, free to play, 3D action games starting in 1998 to about 2002. During this fun time period, I had the idea in the back of my head for an original 3D game that would feature futuristic, car-like hovering Gliders that players would drive around a large course, trying to knock a big ball into each other’s goal (car soccer-style gameplay). Sound a little familiar? Well, this was around 1998/’99, so Rocket League wasn’t even a spark of a thought, and its creators, Psyonix, hadn’t even been formed yet! Actually I was inspired by an older 1983 LucasArts game, BallBlazer, but I wanted to go in a different direction with vehicle handling and mechanics, gravity, and overall ‘feel’ of my game. I even wrote about it all those years ago on the Projects page at our Binary Brotherz website: https://web.archive.org/web/20010406023749/http://www.binarybrotherz.com/projects.html
LucasArts’ 1983 game, BallBlazer
During those early years, I had made several different working prototypes of Glider Ball 3D (named ‘3D Gliders’ back then), but I kind of abandoned this project and even paused game making & graphics programming altogether around 2003, in order to pursue my career in music. Over the next 2 decades of not touching this game, sadly the source code was lost (back before I had GitHub to back everything up and save forever!). Not to worry though, because now I have dusted off this game idea (even though Rocket League has come and gone being viral - but anyways, Glider Ball 3D is very different from Rocket League in several ways), and I’m ready now to give it the treatment it deserves!
Glider Ball 3D is a fast-paced 3D action game for all devices with a browser (even tablets and cell phones!). Visually, it uses real-time path tracing for photorealistic graphics, with accurate reflections and soft shadows from area lights, as well as a custom denoiser designed for pathtraced browser games. As for gameplay, Glider Ball 3D uses my custom physics code to let players pilot their Gliders around the course, being able to collide with opponent Gliders, the ball, the goals, and stick to the interior of the large course on which the match takes place. Speaking of large courses, this is what excites me most about revisiting this game, 20 years later. Back in the late 90’s when I was making prototypes for this game, I only knew how to make a flat, checkered ground plane course that players could ride around on (just like the historic BallBlazer picture above). What I envisioned at the time though, was to have an actual curved surface or enclosed quadric curved shape where the ‘car-soccer’ match would take place. Fast-forward to today, and since I have been working in the field of ray tracing (and all the intersection math that comes with it, ha!), I can now make my dream of 3D curve-shaped courses a reality! It turns out that we can use the same logic and intersection math that we do for rendering shapes (like spheres, cones, paraboloids, capsules, etc), but use them instead for physics raycasting against those same shapes! And it took me 2 weeks straight to get it right, but I have implemented an ‘anti-gravity’ force mechanic that keeps players’ vehicles attached to the interior surface of the large curve-shaped courses. This allows players to navigate fun and interesting courses as they play, often going up the sides of large curved walls and even going totally upside down, riding along the ceiling. I believe that having interesting, curve-shaped courses for players to compete on will take Glider Ball’s gameplay and fun-factor to the next level!
Click below to check out the demo, but please be aware that Glider Ball 3D is still very much a work in progress (W.I.P.). The computer A.I. player’s Glider just sits there, because I haven’t implemented A.I. player logic yet. Also, the simple models for the Gliders are just placeholders - eventually these will be cool ray-traced CSG quadric shapes (think classic 1982 TRON LightCycle-style models!). But the major hurdle of getting the Gliders and ball to correctly hover along the inside of 3D curved interiors has been overcome. When you try out the demo, I think you’ll agree that it’s super fun to navigate the curved maps with your Glider, no matter where it takes you - even if it goes upside down! :)
- Glider Ball 3D (W.I.P.) game on Desktop, click to capture Mouse
- Glider Ball 3D project
A random old sample rendering from the three.js pathtracing renderer as it was back in 2015!
FEATURES
- Real-time interactive Path Tracing at 30-60 FPS in your browser - even on your smartphone! ( What?! )
- First-Person camera navigation through the 3D scene.
- When camera is still, switches to progressive rendering mode and converges on a highest quality photo-realistic result!
- The accumulated render image will converge at around 500-3,000 samples (lower for simple scenes, higher for complex scenes).
- My custom randomized Direct Light targeting now makes images render/converge almost instantly!
- Both Uni-Directional (normal) and Bi-Directional path tracing approaches available for different lighting situations.
- Support for: Spheres, Planes, Discs, Quads, Triangles, and quadrics such as Cylinders, Cones, Ellipsoids, Paraboloids, Hyperboloids, Capsules, and Rings/Torii. Parametric/procedural surfaces (i.e. terrain, clouds, waves, etc.) are handled through Raymarching.
- Constructive Solid Geometry(CSG) allows you to combine 2 shapes using operations like addition, subtraction, and overlap.
- Support for loading models in .gltf and .glb formats
- BVH (Bounding Volume Hierarchy) greatly speeds up rendering of triangle models in gltf/glb format (tested up to 800,000 triangles!)
- Current material options: Metallic (mirrors, gold, etc.), Transparent (glass, water, etc.), Diffuse(matte, chalk, etc), ClearCoat(cars, plastic, polished wood, billiard balls, etc.), Translucent (skin, leaves, cloth, etc.), Subsurface w/ shiny coat (jelly beans, cherries, teeth, polished Jade, etc.)
- Solid transparent objects (i.e. glass tables, glass sculptures, tanks filled with water or other fluid, etc) now obey the Beer-Lambert law for ray color/energy attenuation.
- Support for PBR materials on models in gltf format (albedo diffuse, emissive, metallicRoughness, and normal maps)
- Diffuse/Matte objects use Monte Carlo integration (a random process, hence the visual noise) to sample the unit-hemisphere oriented around the normal of the ray-object hitpoint and collects any light that is being received. This is the key-difference between path tracing and simple old-fashioned ray tracing. This is what produces realistic global illumination effects such as color bleeding/sharing between diffuse objects and refractive caustics from specular/glass/water objects.
- Camera has Depth of Field with real-time adjustable Focal Distance and Aperture Size settings for a still-photography or cinematic look.
- SuperSampling gives beautiful, clean Anti-Aliasing (no jagged edges!)
Experimental Works in Progress (W.I.P.)
The following demos show what I have been experimenting with most recently. They might not work 100% and might have small visual artifacts that I am trying to fix. I just wanted to share some more possible areas in the world of path tracing! :-)
Some pretty interesting shapes can be obtained by deforming objects and/or warping the ray space (position and direction) around these objects. This demo applies a twist warp to the spheres and mirror box and randomizes the positional space of the top purple sphere, creating an acceptable representation of a little cloud.
Normally, all of my demos on this repo use a single pixel sample per frame, which keeps the framerate high (30-60 fps) for all devices, even cell phones. But a naive implementation of just 1 pixel sample per frame results in large amounts of distracting noise. I use my custom-built denoiser to smooth out and quiet down the noise, giving much better picture quality for all devices at interactive framerates. However, several users have requested demos of more than 1 sample per animation frame, because they have more powerful systems with the latest dedicated GPUs, and they want to utilize these resources to the max. So here are a couple of demo examples that allow multiple pixel samples per frame. The first demo is the Geometry Showcase Demo, but with a slider that lets you crank up the pixel samples anywhere from 1 to 100. The second demo is a similar scene, but with dynamic, moving objects like you might have in a game, and also lets you adjust the number of samples per frame. The reason why these multiSPF demos are here in the experimental section is because they do not have the denoiser in place yet. My denoiser relies on the number of samples (which has previously been 1) in its calculations over time to smooth out and converge the image. I will have to convert the denoiser so that it will work properly with multi-sample scenes like these:
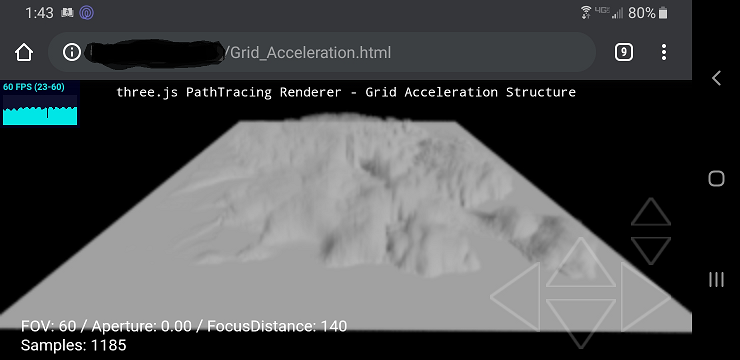
When rendering/raytracing Terrain, you can either raymarch a Perlin noise texture (as I have demonstrated in the above Terrain_Rendering and Planet_Rendering demos), or you can just load in a large pre-existing triangle terrain mesh and raytrace it in the traditional way. Both have their advantages and disadvantages. However, if you want to go the classical raytracing route, to make the land contours a little more convincing, there needs to be a lot of triangles! The following WIP preview demo uses the BVH acceleration structure to load in and quickly render a huge terrain mesh consisting of no less than 734,464 triangles! It really pushes my BVH code to the max - we’re pretty near a million triangles here, pathtracing in WebGL! For now I just stuck a checker texture across the terrain and the environment is simply a large skylight dome. But the good news is that it doesn’t crash the browser, and it runs slightly above 20 fps even on my humble laptop - it’s amazing that all of this is happening inside a browser webpage! Note: because of the large BVH data set that needs to be built at startup, this demo might take a few seconds to compile - please be patient, it’s worth the wait! ;-)
- BVH Large Terrain Demo (W.I.P.) Note: due to the large data set, it might take a few seconds or more to load and compile
Inspired by an older Shadertoy demo by user koiava that I came across - https://www.shadertoy.com/view/MtBSzd - I noticed that my mobile device didn’t have any problems when trying that particular demo with 1000 triangles. I copied / edited / optimized the traversal code and then, I did the unthinkable (for me anyway) - I sent down over 2 million triangles to the engine to be raytraced, then raytraced yet again for the reflection/shadow ray pass (so effectively 4,200,000 triangles in a single frame, and …. my Samsung 9 still runs at nearly 60 fps! It didn’t even blink an eye. Compilation takes maybe 1 second. I couldn’t believe what I was seeing at first.
A technical note about what you are seeing: The data arrives to the fragment shader through a 1024x1024 heightmap texture (I randomly chose a DinoIsland.png heightmap, but it can be anything, even a realtime video texture). The acceleration structure handles sampling the texture and stepping the ray through each sample cell. The number of cells is up to you. At first I tried 32x32 cells, and each cell is a square, and each of the 4 corners of that square is a vertex that is used by 2 triangles sandwiched together back-to-back. So to get the number of triangles that you must raytrace, you take 32 cells width times 32 cells height and remember that each square cell contains 2 triangles, so multiply all that times 2, so 32Wx32Hx2t which is 2048 triangles representing the polygon heightmap. Now 2048 triangles sounds like a lot, and it is for raytracing, but the result mesh looks like an old-school low-poly terrain - it is not detailed enough. On a whim, I tried a resolution of 1024, so each little texel of the 1024x1024 source texture image has its own quad cell, and 2 triangles for every one of those quad cells. So now we have 1024x1024x2, or 2,097,152 triangles every frame! And since the grid looks up the texture to get the triangle vertices every frame, you can animate the height/depth of the displacement as well as even play an HD video (saved as textures) with an embossed-effect on the terrain in real time!
Oddly, it turns out that my Mobile device (a Samsung S9) trounces my laptop at this demo. The humble old laptop achieves maybe 20fps, whereas the newer smartphone rocks at 60fps. It may have to do with the cheap integrated graphics of my laptop, but in any case, this is a true testament to the power of modern smartphone GPUs!
Updates
-
August 27, 2025: Improved technique for diffuse and clearcoat-diffuse surfaces! When path tracing these types of surfaces, sample paths with conflicting goals must be handled. On one hand, we want to send out randomized diffuse sampling rays from the surface, in order to capture any surrounding light/color that is being indirectly reflected from other nearby diffuse surfaces (called diffuse inter-reflection). This gives the warm, soft color bleeding that is associated with diffuse global illumination. However, we are also interested in how these same diffuse surfaces are being illuminated directly by the scene’s main light sources, which gives the important light and color intensity in the final image, as well as shadows that show where the direct light is blocked and can’t reach. In the past, I basically ‘flipped a coin’ and if a random float (between 0.0 and 1.0) ended up below 0.5, I sent the diffuse ray on an indirect light-gathering random path. And if the random number landed above 0.5, then I sent the diffuse ray instead on a path towards a bright light source, in order to get the direct lighting (or shadows) from the main lights in the scene. However, any time you use randomness in a renderer, it comes along with pesky noise, so the diffuse surfaces were always too noisy for my taste. Then about 3 months ago, I had an idea - why not use the same mini-stack method that I use for transparent surfaces, but for this diffuse sampling problem as well? To clarify, instead of randomizing the path on transparent surfaces (like glass) to either go through the object (refraction), or bounce off the surface (mirror reflection), which would produce noise on both paths, instead I first go down the refracted/transmitted path, while creating a new reflection ray and pushing it on a small temporary ‘stack’ for later use. Then, when the transmitted refraction ray is done with all of its bouncing and color gathering, I pop the saved reflection ray off the stack and start its origin back at the same old juncture point on the transparent surface. Then it is sent on its own way, which is the typical mirror-reflected direction. This technique produces noise-free transparent surfaces with correct double images on the surface, at the expense of a little more shader complexity. So, I applied the same logic to diffuse surfaces: I first send a ray on the path towards the target light source in the scene (direct light shadow ray), but at the same time, create a randomized indirect diffuse color gathering ray, and push it on the mini-stack for later use. When the first direct light ray (shadow ray) has completed its work, the previously-saved random diffuse color-gathering ray is popped off the stack, its origin is started at the same old junction back on the diffuse surface, and it is sent on its pre-determined randomized diffuse path. So we get the best of both worlds: at each bounce we get the important shadow ray or direct lighting contribution, but also we get the soft, diffuse color bleeding from nearby surfaces. Now, we can’t expect all of the noise to go away entirely, because the indirect diffuse rays are necessarily randomized, which produce noise on their own. But with this mini stack-based technique, the diffuse noise is significantly reduced! And with the addition of my custom denoiser, diffuse surfaces now look cleaner and smoother than ever!
-
April 14, 2025: New Quads-Only Model Rendering technique and demo! Now that I have worked with Quads for a while, here is my ray tracing hot take: For 3D model rendering, we need to move away from Triangles as primitives, and move towards Quads instead. Recently I came across a great article by Alexander Reshetov (NVIDIA) in the book Ray Tracing Gems. In this article, Alexander and his colleagues replace all of the Triangles in their raytraced models with Quads - more specifically, BiLinear Patches, which are quadratic (requiring only degree 2 to solve, like the sphere, cylinder, cone, and other common ray tracing shapes). These types of Quads have advantageous properties, such as they are free to be non-planar (the 4 vertices can be located anywhere and the quad is still renderable), they can be bent or even twisted on themselves, no changes are necessary to the vertex data when going from Tris to Quads (pos, normals, and uvs can remain exactly the same!), and in terms of model creation artists: their workflows often start out in Quads-mode when modeling, so artists could just stay in their preferred Quads-mode from start to finish - no tesselation to Triangles needed. And when dealing with models that were originally in Triangles, by combining every 2 Triangles into 1 Quad, not only do you save memory and BVH size (by at least 50%), intersecting 1 Quad is actually faster to intersect than intersecting the 2 Triangles it was made from! Now, as with any method, there are some trade-offs: such as some models are not so easy to automatically convert from Tris to Quads (like the Stanford Bunny & Dragon models), and Quads are not supported by most modern model formats (I had to use the older OBJ format for the ‘Quads-Only’ demo, which still has quad support). This is simply because Triangles are the industry standard, not Quads. But I believe that if enough people want to use Quads and artists would like to keep their workflows the same without the need for tesselating to Triangles, then I could see more formats (like the popular glTF) adding basic support for Quads.
-
March 5, 2025: I have implemented a denoising system that I am finally satisfied with. Monte Carlo path tracing is inherently a wonderful but very noisy process. If nothing is done, and we do naive raw path tracing, the noise will be significant and very distracting, especially on dynamic scenes with moving camera and objects. One solution is to just use AI denoising (like NVIDIA offers), but I can’t really use this approach, because it is proprietary, and it requires certain hardware specs that would exclude most platforms (like mobile), that I would like to target. If we want all the path-tracing scenes to run on any device with a browser (basically everything these days!), then we must take the more traditional denoising approach. This involves first separating the pixels on screen by how alike they are to their neighbor pixels. If we have a flat green wall for instance, all the pixels that cover this surface will be of the same nature, and we can apply a large blur filter (a 7x7 kernel) to these similar pixels and the noise will be really smoothed out, if not eradicated altogether. If however, we detect that as we move from our pixel that we’re currently working on over to one of its immediate neighbors, and that there is some sort of abrupt change in color, objectID, or surface normal, then we mark that pixel as an ‘edge’ pixel. This is called edge detection and is necessary for most denoising systems. When we have successfully located all the edges in the camera’s view, we keep these special marked edge pixels crisp and sharp by not applying the blur filter to them. This keeps boundaries between colors (think checkerboard floor), surface normals (think a corner of a room interior), and different objects (a sphere slightly overlapping a box for example) well-defined and sharp. And then the parts of the scene that are similar, which would have been extremely noisy due to the Monte Carlo raw path tracing process, will be nicely smoothed out and much of the noise either goes away or remains in a much more tolerant soft light/dark network of larger color patches that come in and out of existence (kind of like a boiling convection surface). These are just the basics - there are actually a lot more nuanced and subtle points that must be worked on, experimented with, and constantly tweaked to get the best looking final image, while still also performing well. After working on/off for years on my own custom denoising and edge detection system, I’m happy to report that I now (finally!) have a denoiser in place that I’m proud of and that works well on all types of scenes, both static and dynamic. This updated denoising system is used everywhere on all my demos and games - so when you click on one of them, enjoy the smooth, sharp scenery!
-
September 12, 2024: Now all glass and ClearCoat surfaces are noise-free! In the recent past, I improved my technique for rendering smooth, transparent surfaces containing both reflections and refractions. However, I didn’t understand at the time how to handle both the reflected image and the refracted (or transmitted) image underneath (think glass sphere), as far as the de-noiser is concerned. The de-noiser requires accurate information across groups of pixels so that it can first determine where the edges are (between objects, or between surfaces with differing normals), and then it can keep those boundary edges sharp while blurring the noisy diffuse part that is uniform across the objects. Since my de-noising scheme was unable to resolve the double images (reflection vs. refraction underneath), I had simply side-stepped the issue and made the whole glass object slightly noisy and blurry. This worked ok I guess, but I was never happy with it. But over the summer, I went back to this problem, and approached it with new, fresh eyes. I realized that I could delay parts of my de-noiser, based on where the rays were in the tight ‘bounces’ loop. In a nutshell, I leave the de-noiser on for the 1st bounce (initial raycast from the camera), so that it sees and detects all of the boundaries of objects against the background sky (or against background walls of a room), and also boundaries between different objects. Then if the ray tracer encounters a glass sphere for example, I wait until the refracted rays have passed all the way through the sphere and behind the sphere - then I turn on the de-noiser again, which once more checks for edges to keep sharp and diffuse noisy surfaces to blur. Then, for the reflected portion (on the outside of the sphere), I once more turn on the de-noiser and check for edges out in the scene that must remain sharp. So essentially, transparent surfaces are de-noised three times within the same tight bounces loop. The result is a much sharper and crisp refracted image (that is often upside down in glass spheres, or severely bent due to the refractive index), as well as a cleaner, sharper reflected image on top of that. To see this latest technique in action, check out my ‘Geometry Showcase’ and ‘Quadric Geometry Showcase’ demos. Try moving and rotating the camera around, all while staring at the glass sphere (and other glass objects). Also, try flying the camera inside the glass sphere and looking at your surroundings through the thick glass. I think you’ll be pleased by how smooth, crisp, and virtually noise-free these surfaces are now! :)
-
March 8, 2024: Over the last year on and off, I have been working on an efficient method to ray trace a Torus. At long last, I present the Cheap Torus - my custom approximation to the beautiful Torus shape. Historically, the Torus has always been difficult and expensive to ray trace, because it is a quartic (degree 4) shape which requires you to solve for the roots of a quartic equation. I’ve tried many different quartic solvers out there (I even tried ray marching a torus signed distance field, or sdf) and they are either too finnicky to use and get looking right, or too expensive to efficiently run on normal hardware and mobile. And then after doing all that work, you still get rendering artifacts like gaps and thin cracks at larger scales, due to limited GPU shader float precision. So, determined to come up with a better solution, I set out on a long journey to efficiently render a Torus that would be air-tight at all scales. Along this rabbit hole (ha), I discovered a cool trick of combining 2 simple quadric shapes (only degree 2), namely the Hyperboloid (hourglass) and the truncated Sphere (both top and bottom removed). When these 2 simple shapes are combined in just the right way, we get a very close approximation to the Torus, free of gap artifacts at all scales and very fast to render. The Hyperboloid (hourglass) is used for the inner part of the Torus, while the top-and-bottom-truncated Sphere is used for the outside of the Torus. Where these 2 shapes meet, there was an annoying seam, so I hid this seam by slightly bending the surface normals reported back from the 2 different shapes. This results in a smooth, rounded-looking surface on the very top and bottom of the Torus. Now if you fly the camera up really close along the side edge of my Cheap Torus, the illusion might be broken, but at most viewing angles, it looks perfect. You can even fly your camera through the inside of a large glass Torus! The Cheap Torus demo allows you to change the Torus’ scale, roatation, hole size, and material. Now we can finally have multiple, air-tight Torii all over our scenes without worrying about precision artifacts or performance costs!
-
February 15, 2023: I developed a new custom system for handling large amounts of geometry. For now I’m simply calling it the ‘Shapes BVH’. Rather than dealing with the usual glTF models with their various triangle primitives and vertices, my new system instead builds a BVH (which is an axis-aligned bounding box binary tree) around large amounts of simple primitive shapes like spheres, boxes, cylinders, etc. Using these ray tracing-friendly shapes, we can build up scenes of almost any complexity. Just like traditional triangular models, each small building-shape (primitive) can have its own unique transform (scale, rotation, position) as well as its own material properties. Unlike triangular models, which are, in the end, just an approximation to the original shape/surface, the Shapes BVH scenes are rendered with pixel-perfect accuracy (because they are composed of smaller mathematical, analytic shapes). Certain scenes call for the traditional triangle model/BVH system (like the Stanford Bunny, Stanford Dragon and Damaged Helmet glTF scenes). But other types of scenes requiring a lot of simple primitives don’t really work well with the older triangle BVH system – especially on mobile, where triangle intersection is a performance bottleneck. By using the Shapes BVH instead, now we can have arbitrarily complex and densely populated scenes that can be path traced in real time at 30-60 fps, even on your phone! Better yet, since these scenes are made from simple quadric shapes, you can just call familiar three.js JavaScript commands (like ‘new THREE.SphereGeometry’, ‘new THREE.BoxGeometry’, ‘new THREE.PhysicalMaterial’, and ‘new THREE.Mesh’) to construct any scene you can imagine. To see this new system in action, check out the ‘Invisible Date’, ‘Sphereflake’, and ‘Cube Fractal 3D’ demos. The Sphereflake and Cube Fractal demos both showcase the sheer amount of geometry you can have in a scene, and still have it run smoothly on any device, (even your cell phone!). The Invisible Date scene showcases the different kind of shapes you can use, the various transformations you can do on those shapes, and the various physical material properties you can assign to each and every small shape that is used to build up the final scene.
-
January 17th, 2023: New Year - New rendering technique! Major update across the entire repo (and also my path traced games) to how transparent (glass, water, etc) and clearCoat (billiard balls, polished wood, car paint, etc) materials are handled. If you’ve followed my project from the beginning, you might remember that I have gone back and forth on the technique used to efficiently render objects with these transparent/semi-transparent materials. One way is to use Monte Carlo integration and essentially ‘flip a coin’ every time a ray encounters a transparent surface. If ‘heads’, the ray reflects or bounces off of the surface - if ‘tails’, the ray refracts or transmits through the surface. Using a progressive renderer, this method will eventually converge to the correct result, which is a double-image on the surface. Half of it is the reflection we see, and the other half is the world beyond the surface that we can also see at the same time (think of the double-image you get when looking at a shallow angle through a window). Although this technique works well, the major drawback is that you get 2 noisy images on the transparent surface, due to the Monte Carlo randomization of the rays’ path choices. On the other hand, we can do away with the random decisions (and noise), and instead spawn 2 rays when we encounter these transparent surfaces. Although this creates slighty more shader complexity (inside the tight ‘bounces’ loop), the reward is definitely worth the cost because now we have a smooth, non-noisy, steady double-image appearing on all transparent surfaces. The effect is most noticeable when moving the camera around and looking at these surfaces from different angles. Now you see a reflection perfectly blended with a transmission (or refraction), which more accurately resembles the real world transparent objects that we see every day (and take for granted!). The reason I have returned to this double ray spawning method (1 reflection / 1 transmission ray) after having it the other Monte Carlo way for a year, is that this time around, I figured out how to implement it better. Not only does it look smoother and more correct than my previous attempts at this technique, but it is also more performant. Enjoy looking at (and through!) all of the transparent and clearCoat materials! :)
TODO
- For simple scenes without gltf models, instead of scene description hard-coded in the path tracing shader, let the scene be defined using familiar Three.js mesh creation commands (2/6/23 made progress in this area with my new ‘Shapes BVH’ system - the ‘Invisible Date’ demo above shows how you can use simple Three.js commands to build up this classic scene. Each small object has a unique THREE.Geometry, THREE.PhysicalMaterial, and THREE.Mesh/THREE.Object3D for placing, scaling, and rotating the object). Next step is to be able to create and load any arbritrary scene that uses the standard, simple Three.js library calls for scene construction.
- Dynamic Scene description/BVH rigged model animation streamed real-time to the GPU path tracer (1/21/21 made progress in this area by working on my new game The Sentinel: 2nd Look. Featues a dynamic top-level BVH that can change and update itself every animation frame)
ABOUT
- This project began in 2015 as a port of Kevin Beason’s brilliant ‘smallPT’ (“small PathTracer”) over to the Three.js WebGL framework. http://www.kevinbeason.com/smallpt/ However, Kevin’s original smallPT only supported spheres of various sizes and was meant to render offline, saving the image to a PPM text file (not real-time). Despite these shortcomings, his ability to simplify, condense, and neatly fit an unbiased ground-truth Monte Carlo path tracer into just 100 lines of C++ code was truly inspiring. Also during this time I was greatly inspired by the amazing Brigade series of path tracers. Originally created in 2013 by Jacco Bikker https://github.com/jbikker, Brigade 1 and Brigade 2 featured the first interactive and real-time path tracers ever, by moving the rendering code from the CPU over to the GPU (GPUs back then were just getting powerful and programmable enough to do this). Using consumer-grade GTX graphics cards for typical desktop gaming PCs of that time, Jacco and his colleagues were able to make path tracing go really fast!: https://www.youtube.com/watch?v=VtLuStcTRXQ
Once I had Kevin’s basic smallPT ported to JavaScript/WebGL and working in the browser, I started to add my own features little by little over the years, with the end goal being something that performs as well as the Brigade renderers, and looks as good as a final smallPT output rendering, but that works everywhere on any device (even tablets and cell phones!). So far, the features that I have added include: real-time progressive rendering on any device with a browser, FirstPerson Camera controls with Depth of Field, a more complete Ray-Object intersection support library (such as planes, triangles, quadrics, CSG shapes, etc.), loading and rendering glTF triangle models, custom static and dynamic GPU BVH acceleration structures, support for additional materials like ClearCoat, SubSurface and PBR materials, a custom tight ‘bounces’ loop in my shaders that spawns rays of a similar nature at the same time (i.e. secondary refracted rays together, secondary reflection rays together, secondary diffuse color-gathering rays together, etc) resulting in more GPU coherence and speed, and a custom denoising system (with edge detection and blur filter kernels).
More examples, features, and content to come!